Creating and Managing Agents
Learn how to create agents, configure them, and organize them with parent-child relationships.
What Are Agents?
Agents are autonomous AI assistants that operate within Fleet. They:
- Execute tasks independently using tools (browser, terminal, file operations)
- Maintain memory with persistent conversation history
- Organize hierarchically with parent-child relationships (main agent → sub-agents)
- Specialize through custom instructions and tool permissions
- Run on schedules or triggered by events
Agent Types
Main Agent (Parent)
- Your primary assistant
- Can spawn and manage sub-agents
- Receives reports from all sub-agents
Sub-Agents (Child)
- Specialized workers spawned by a parent agent
- Only one level deep — sub-agents cannot create their own sub-agents
- Operate independently with isolated context
- Report back to parent on completion
- Useful for parallel work or isolating tasks
Creating Agents
From the Dashboard
Click New Agent (Cmd+N) and start chatting.
Sub-Agents
Agents automatically create sub-agents when they need to delegate work. You cannot create sub-agents manually — only agents can spawn them. The agent will spin up sub-agents as needed for complex tasks, and sub-agents are limited to one level (they cannot create their own sub-agents).
Configuring Agents
Rename an Agent
Agents automatically choose their own name once they understand their role. If you want to rename an agent manually:
- Click the agent name in the bottom-left status bar, or
- Right-click the agent in the dashboard and select Rename
Model Selection
Fleet uses a 2-tier model system:
Default Model — Main model for agent conversations and task execution
- Claude Sonnet 4.5 — Recommended for most tasks. Good balance of speed and capability.
Subagent Model — Used for spawned subagents (explore, bash)
- Claude Haiku 4.5 — Recommended for efficiency. Fast and cost-effective for subtasks.
Configure different models for each tier in Settings → Models. Each agent can override the global model settings.
Plan Mode

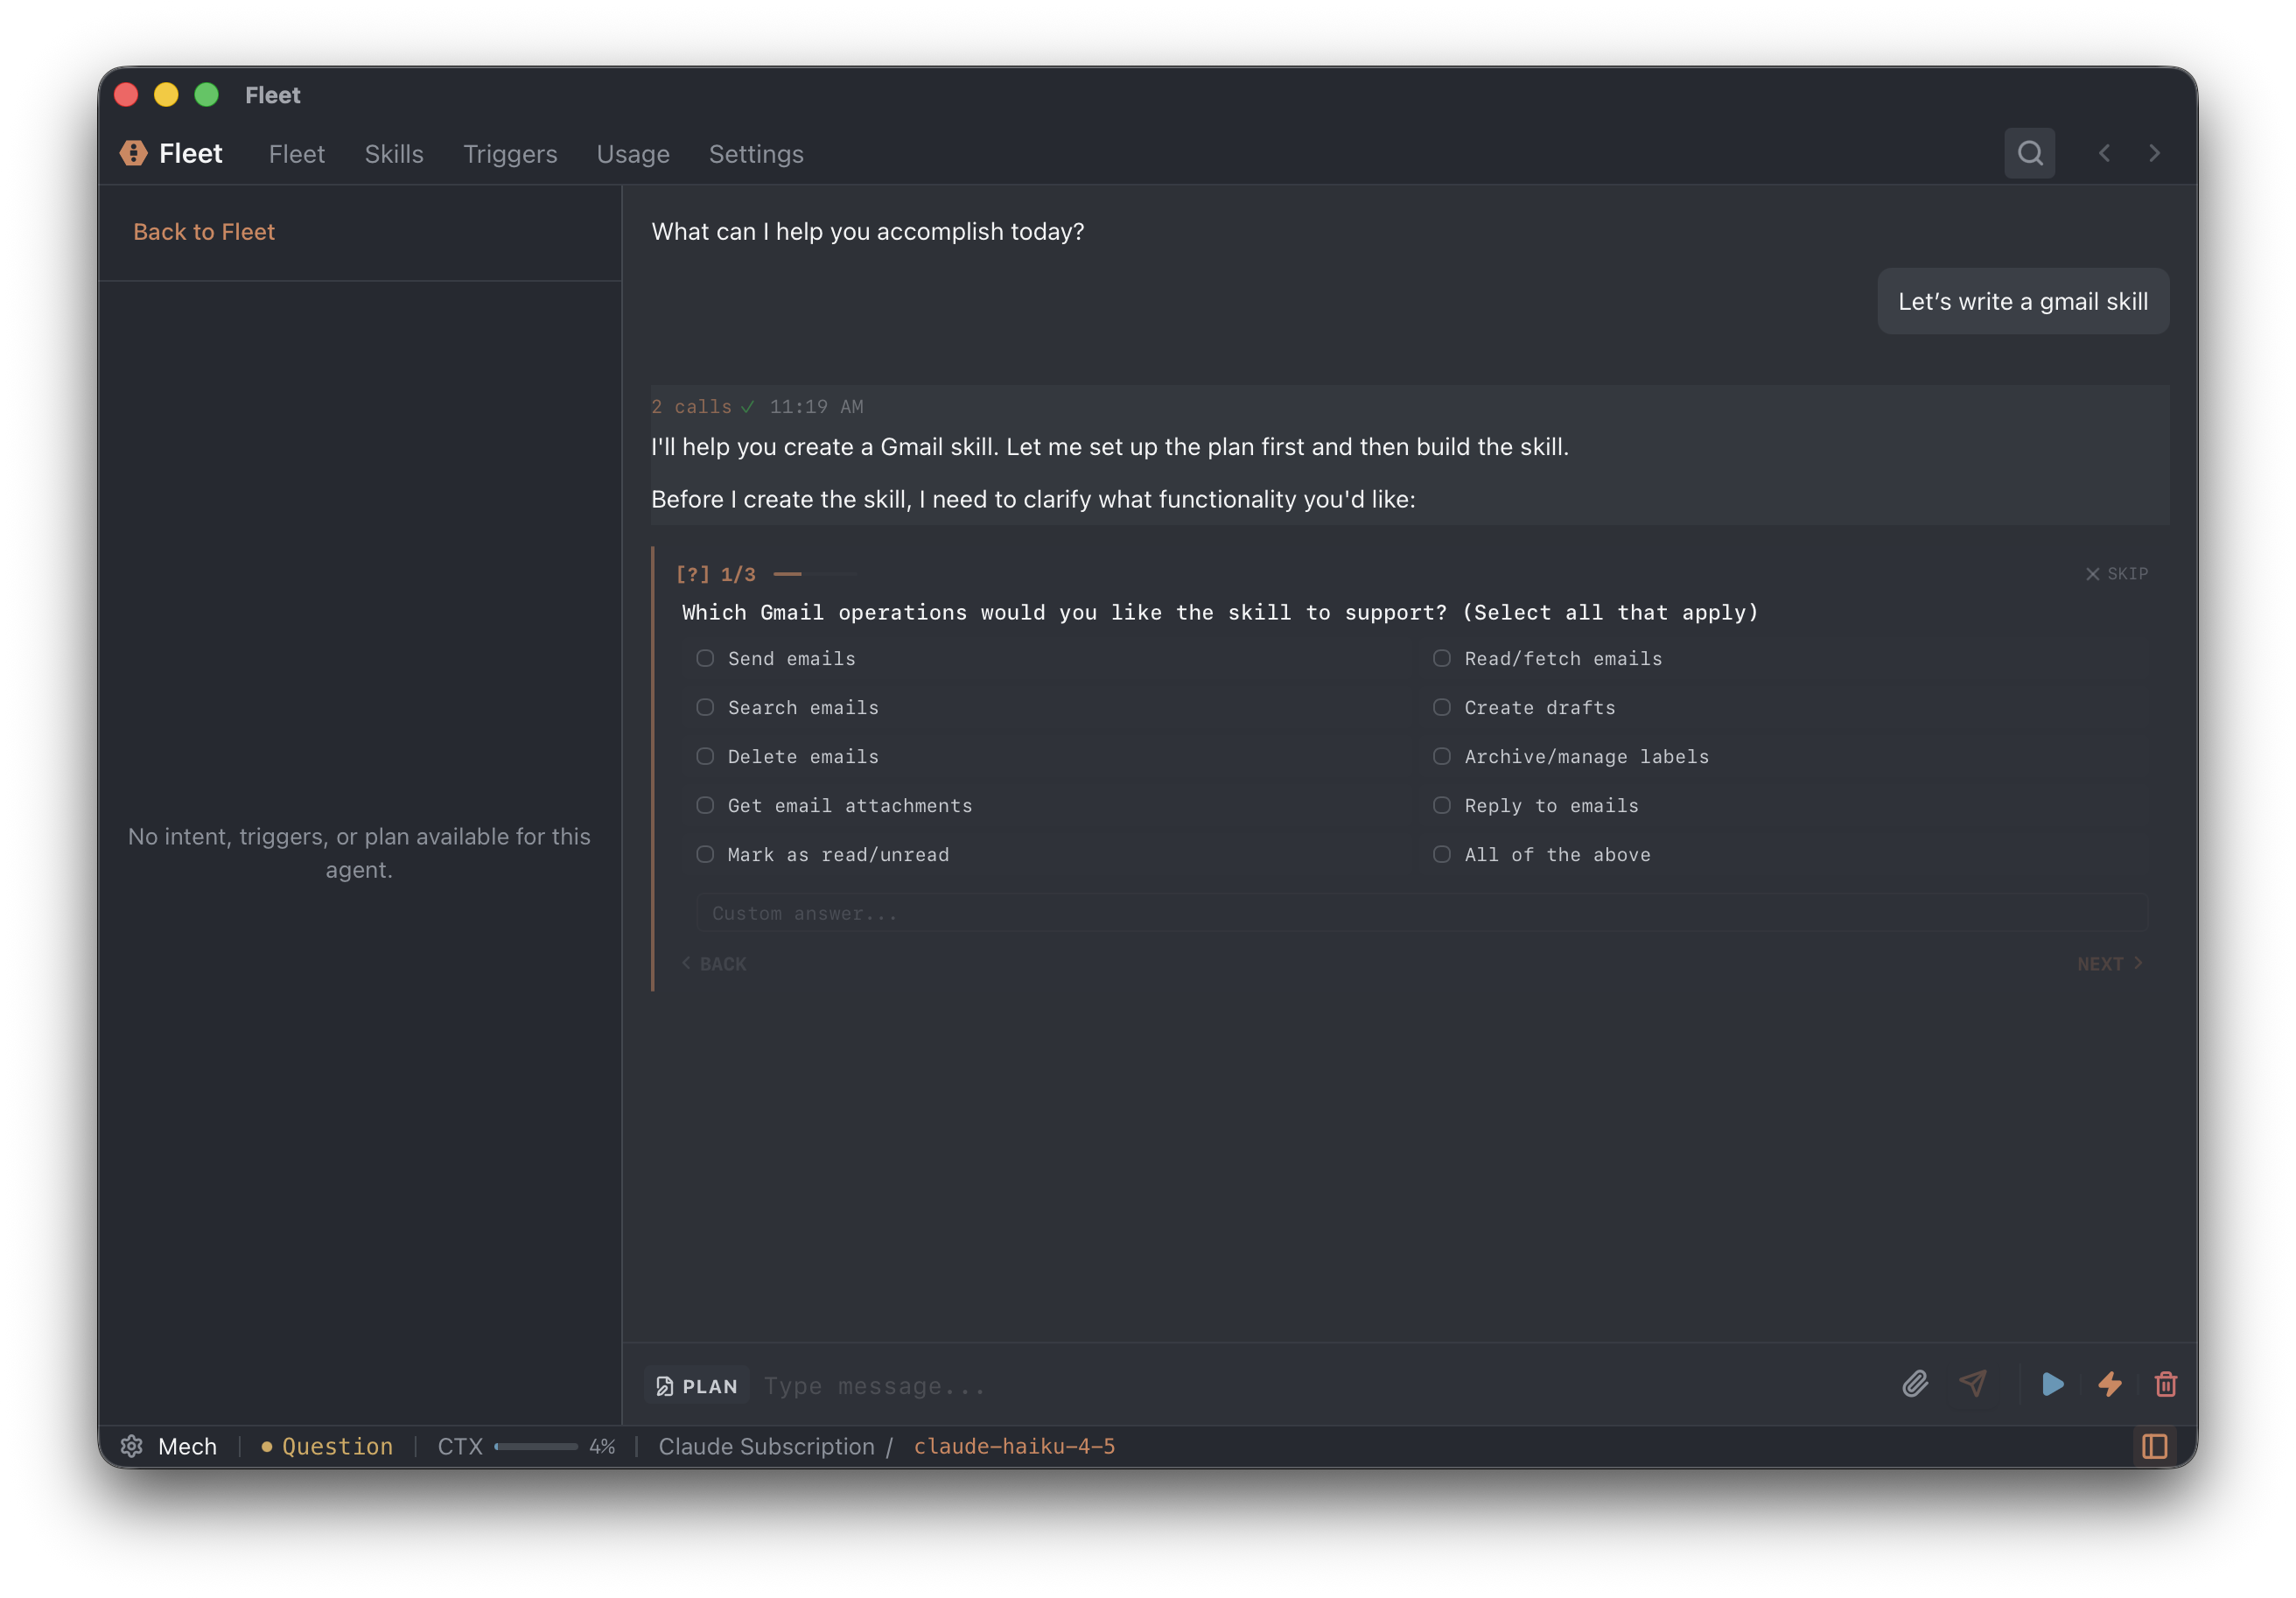
You can enter plan mode to collaborate with the agent on complex tasks before execution. In plan mode, you chat with the agent to write a plan document saved in the plans directory.
How Plan Mode Works:
- Enter Plan Mode — Click the plan mode button or use the keyboard shortcut to enter plan mode
- Two-Pane Interface — Left side shows a markdown editor with the plan document, right side shows a chat interface for discussing the plan with the agent
- Collaborative Editing — Both you and the agent can edit the plan document. Chat with the agent to refine the approach
- Finalization — Once you're satisfied with the plan, click finalize. The agent will create todo items from the plan and begin working through them
- Execution — The agent works through the todo items step-by-step, reporting progress along the way
Attachments in Plan Mode: You can attach files and images to the plan document to give the agent additional context. Click the attachment button or drag files into the editor.
By default, plan mode uses the planning model (Sonnet/Opus) for better reasoning, then switches back to the chat model (Haiku) for execution. You can configure this in Settings — choose any provider/model for plan mode.
Tool Permissions
Control what actions an agent can take in Settings → Permissions. You can enable or disable specific tools like file access, shell commands, browser, and sub-agent creation.
Custom Allow Lists: Beyond the standard execution modes, you can create custom permission rules to fine-tune what agents can do. For example:
- Allow npm commands in Restricted mode
- Deny file deletion even in Open mode
- Allow writing only to specific directories
See Custom Permission Rules for details on creating custom rules.
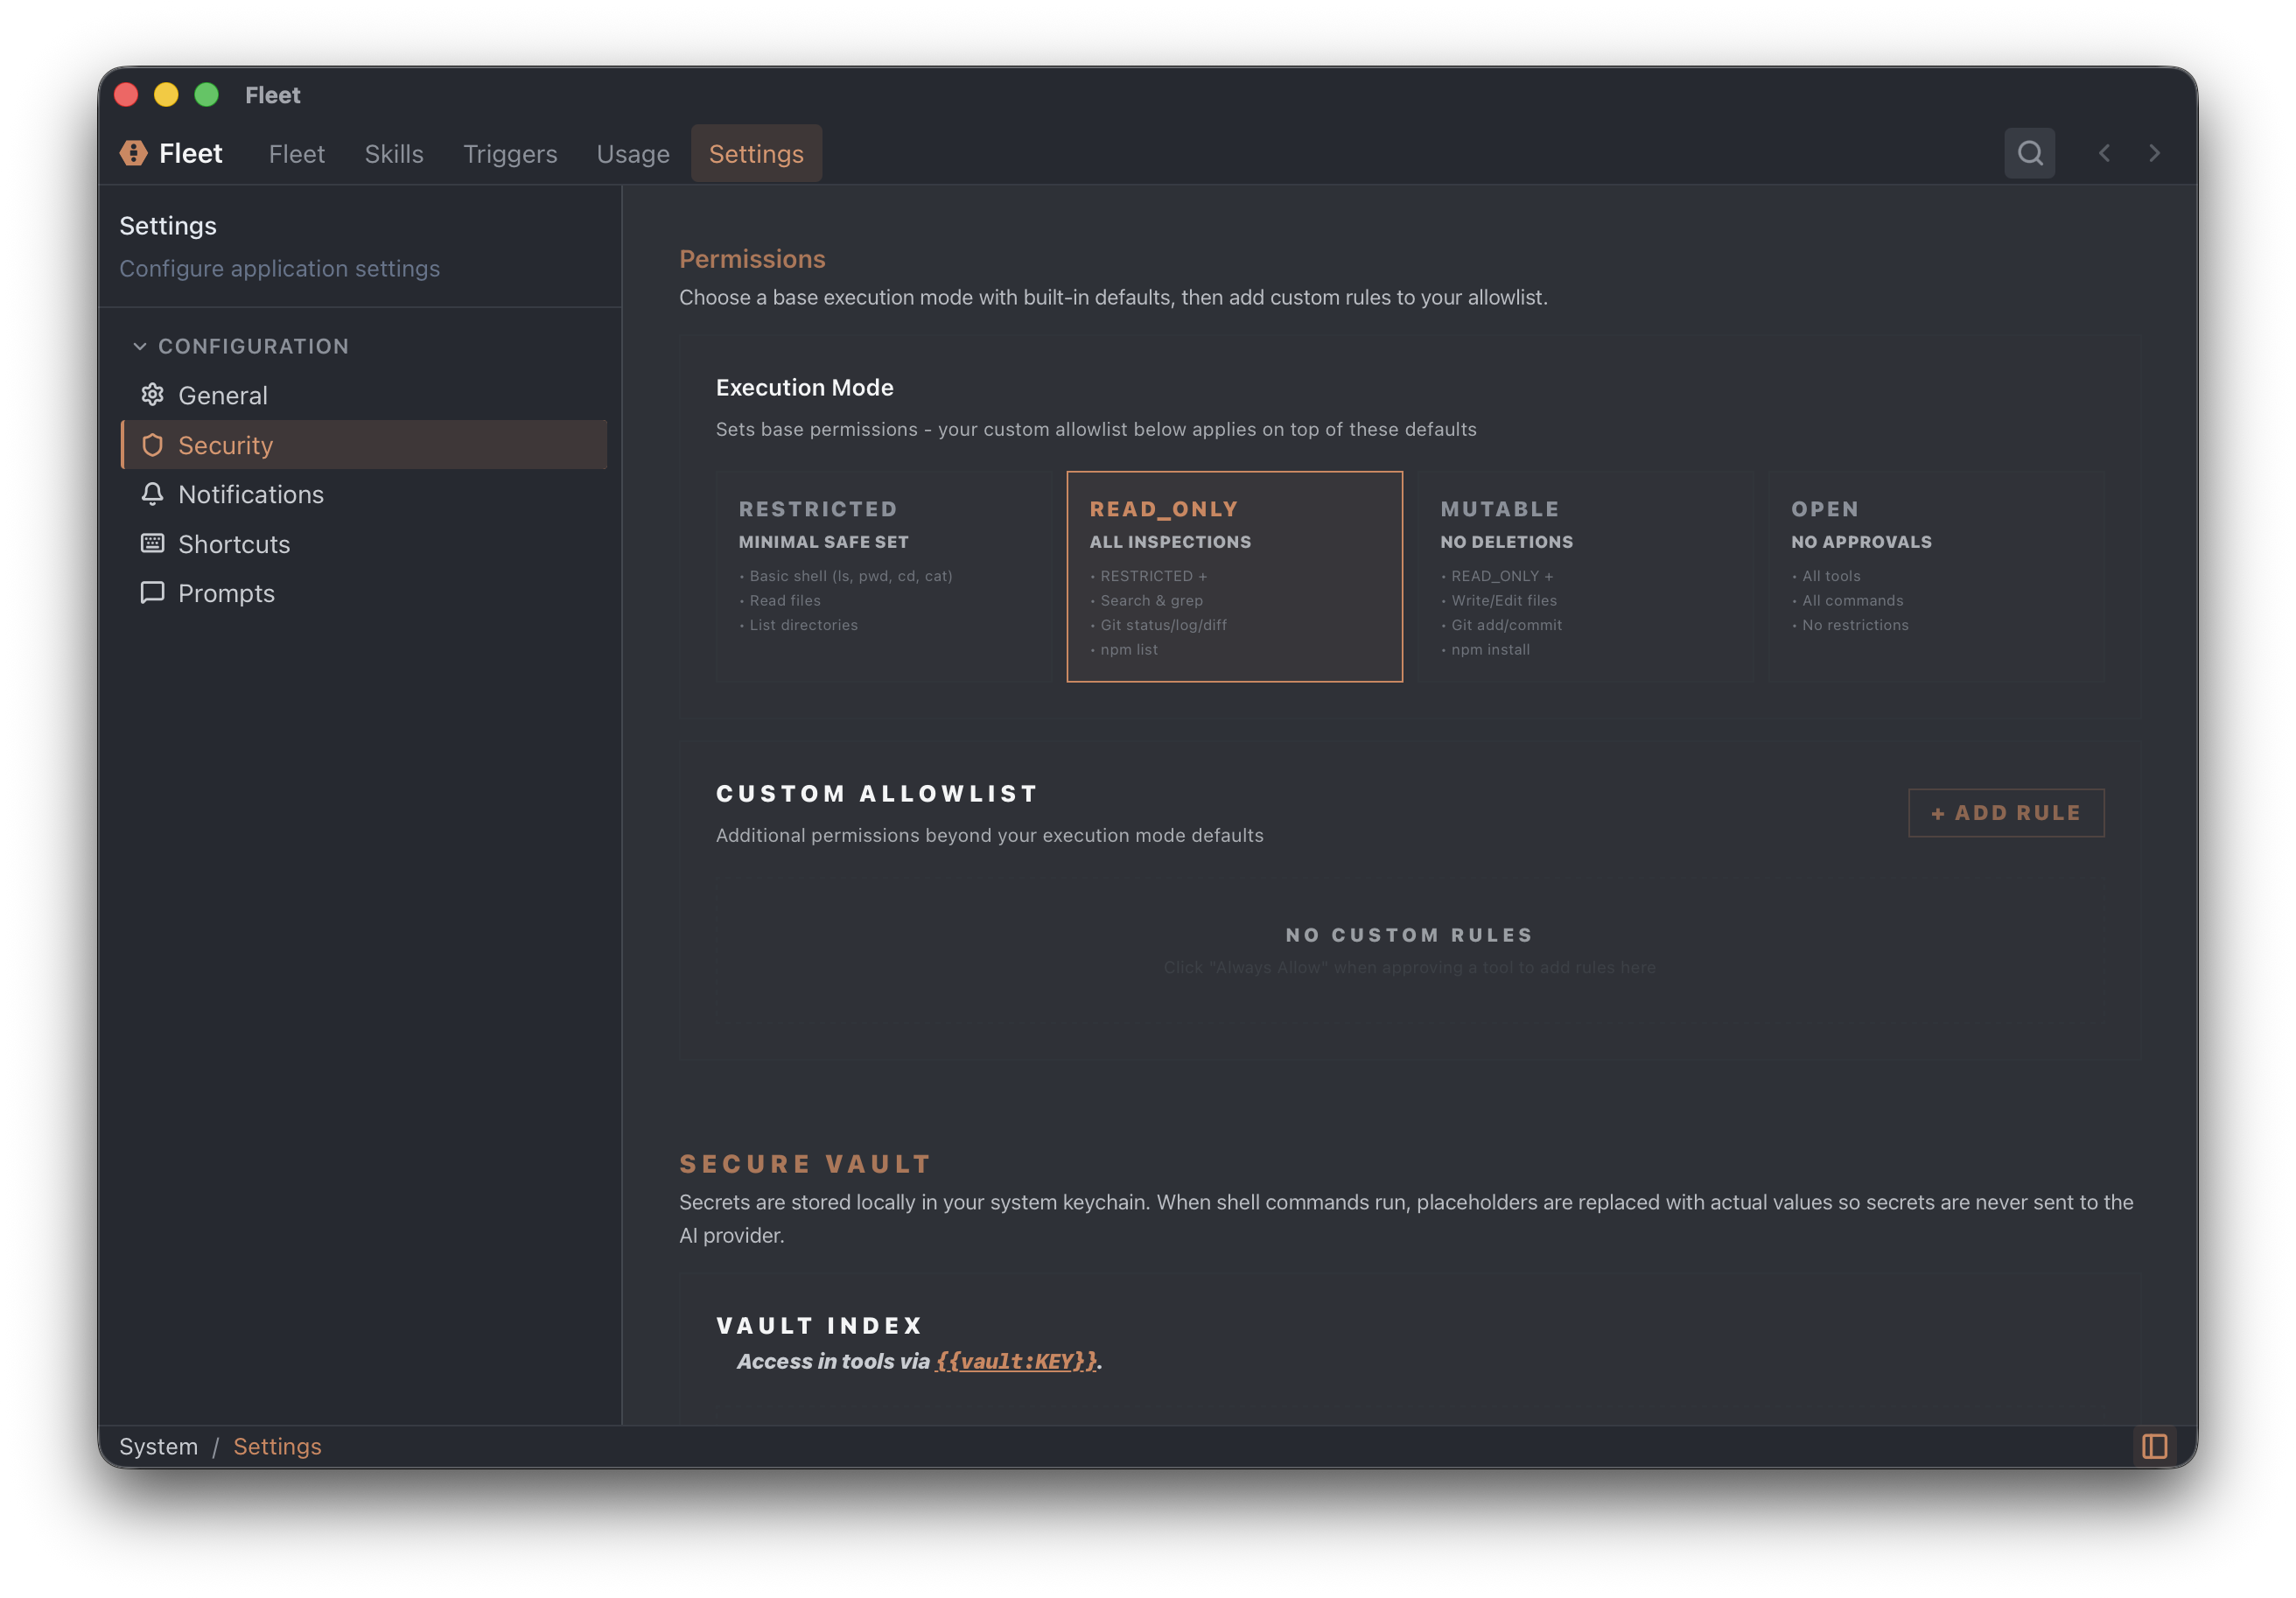
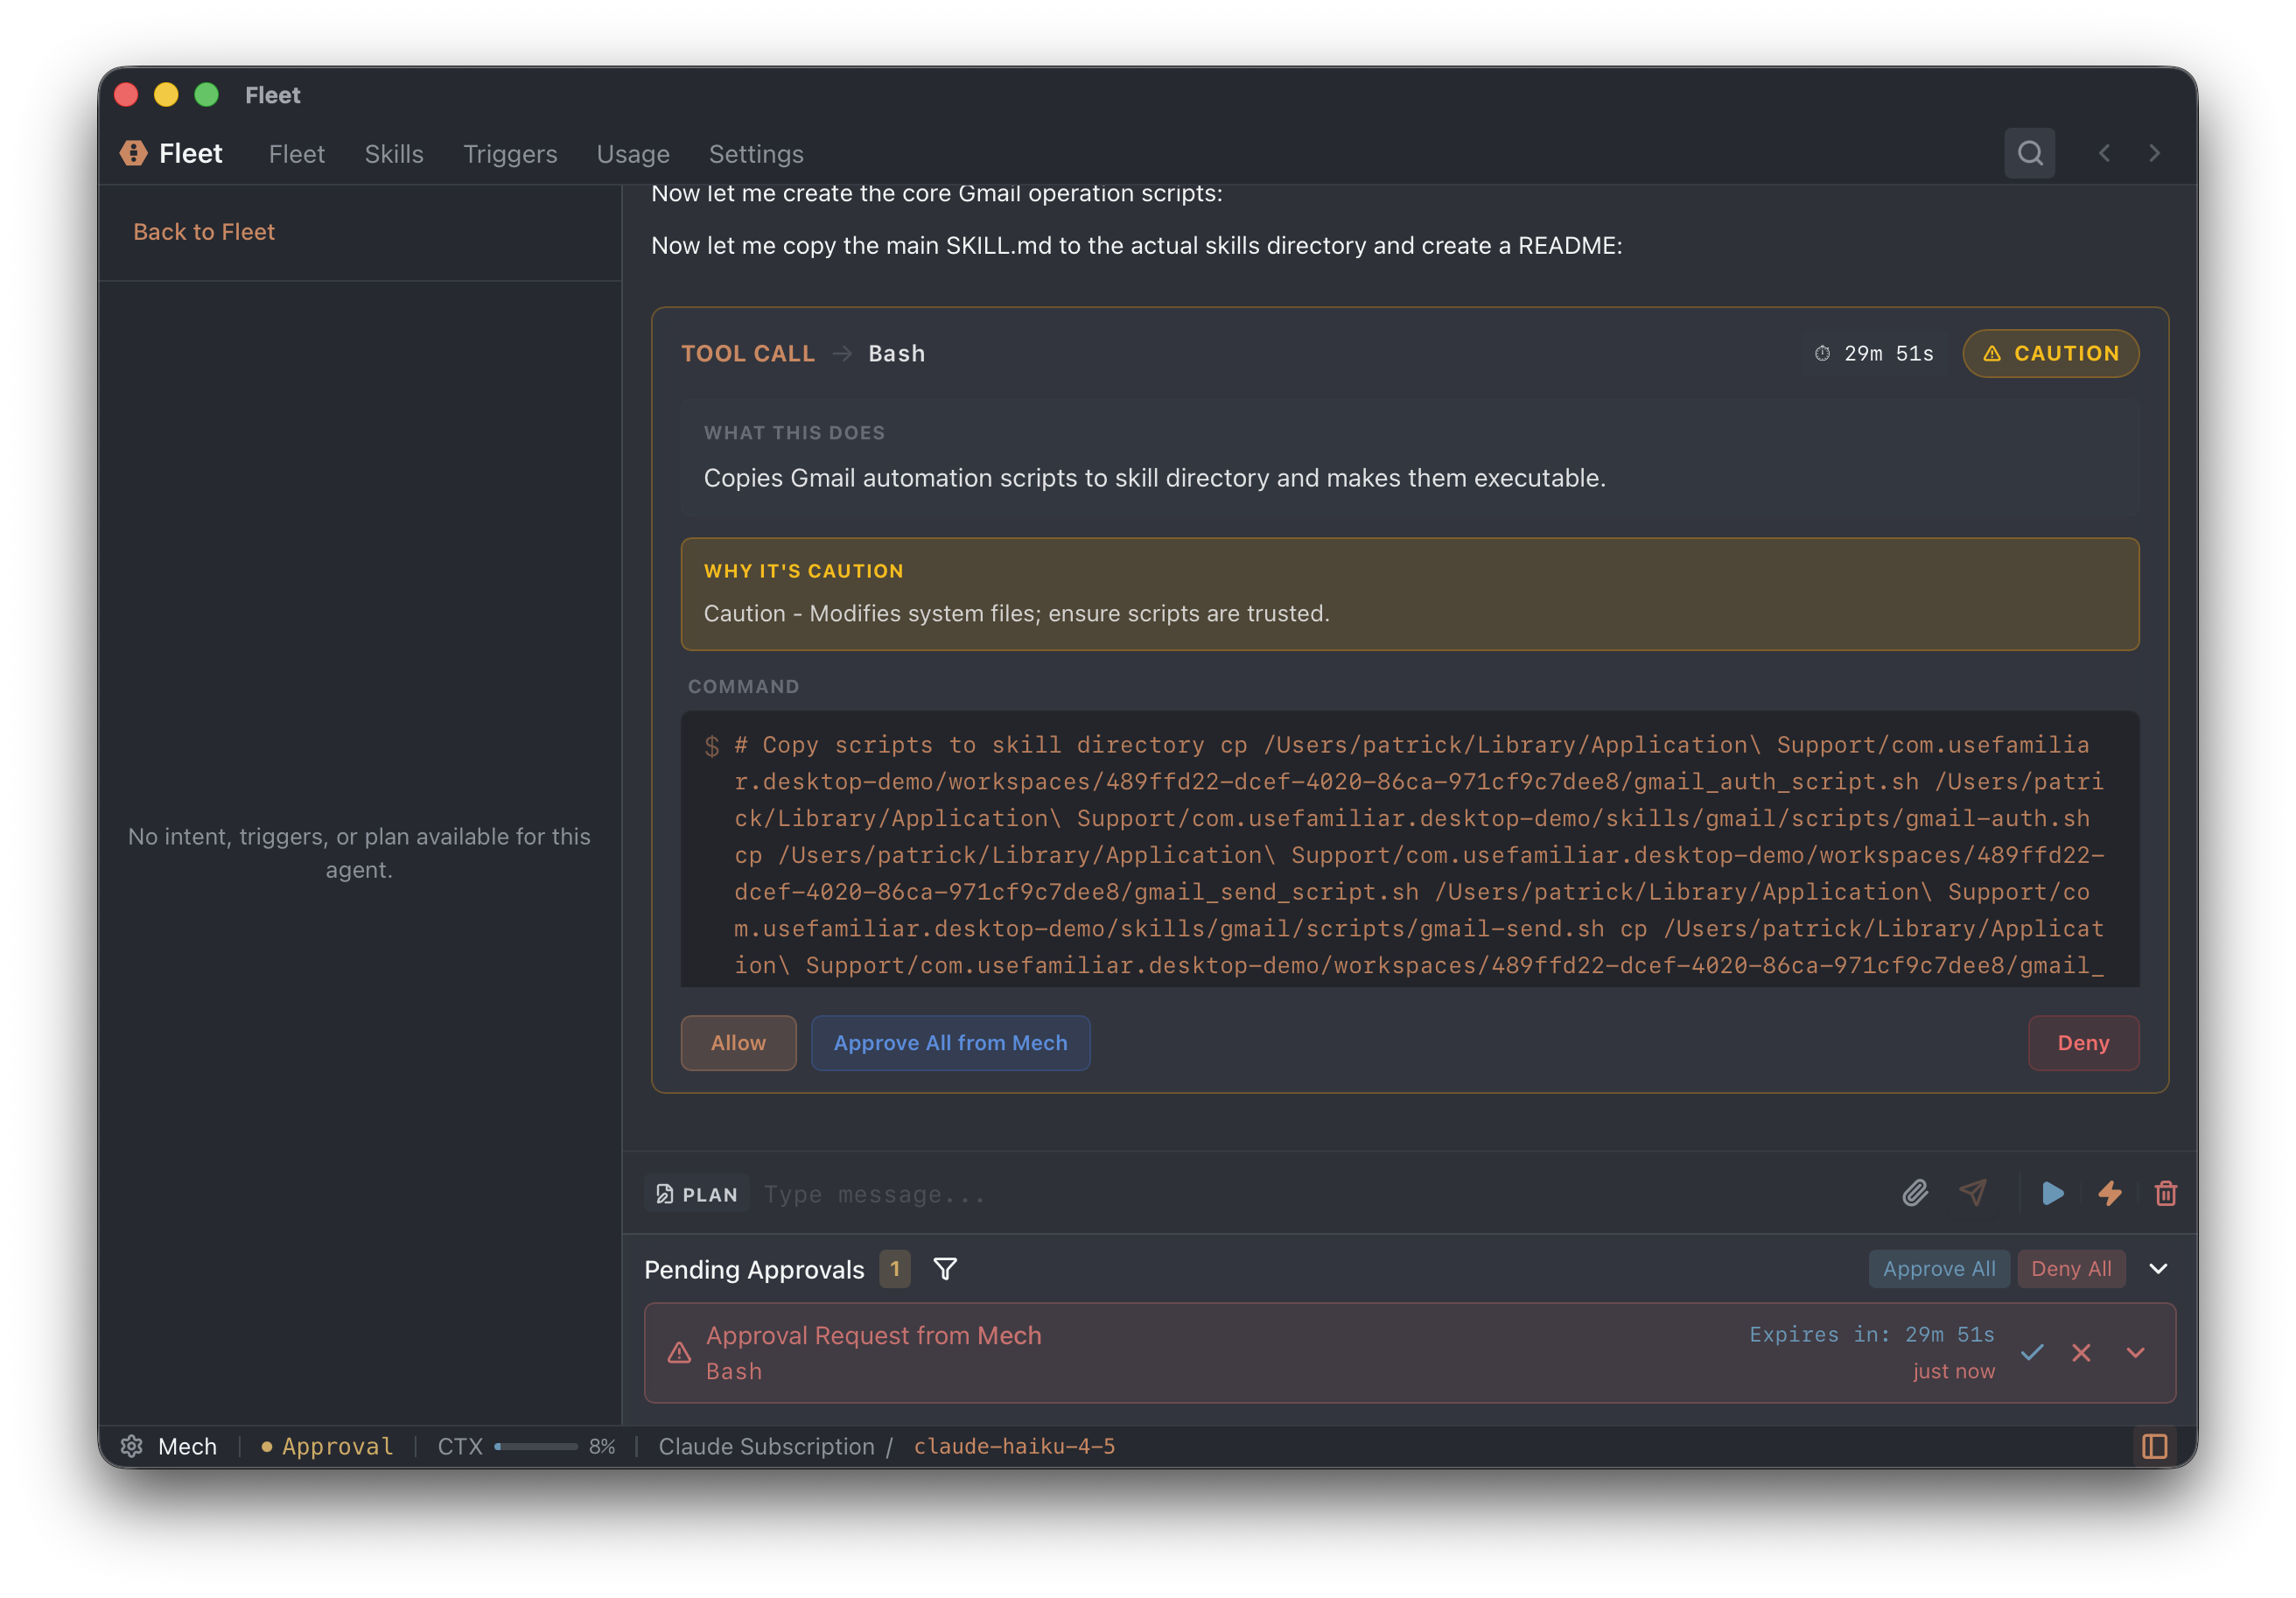
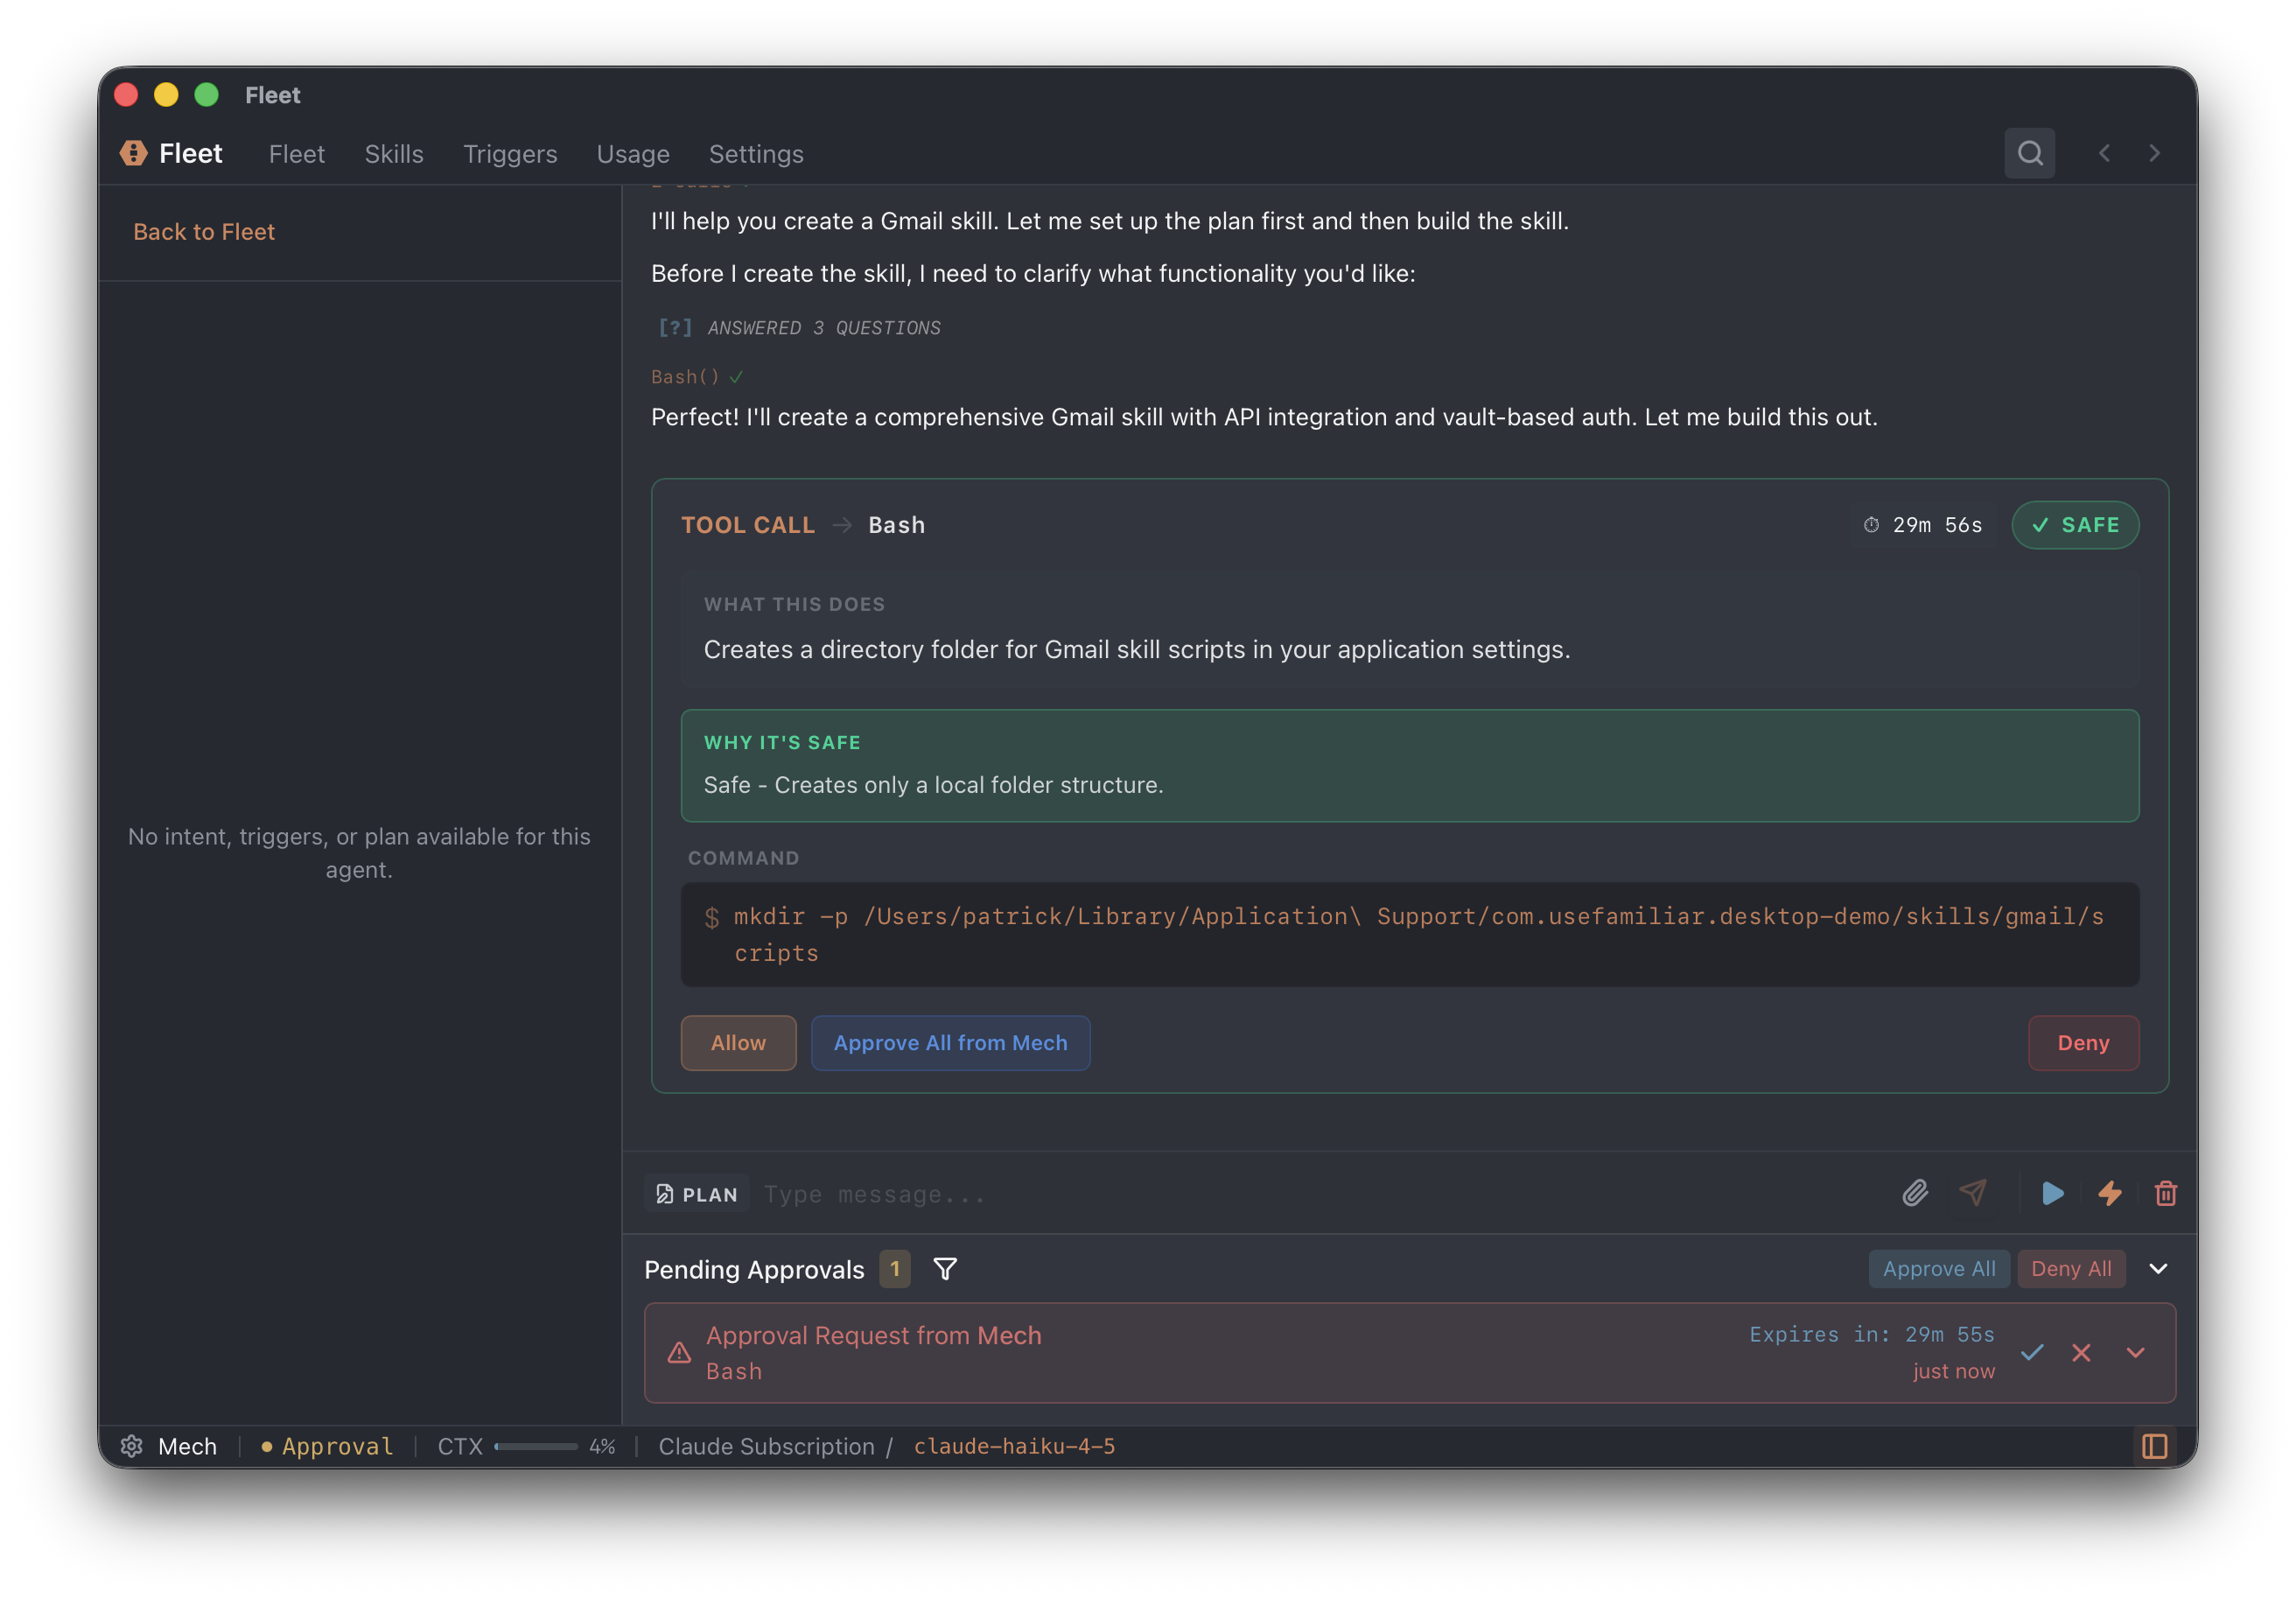
Execution Mode & Approvals
The execution mode (Settings → Security → Execution Mode) determines when agents ask for approval:
- Restricted — Most commands require approval
- Read Only — Agents can read files and directories, run inspection commands, and search. No write or delete operations allowed.
- Mutable — Destructive commands require approval
- Open — No approval required
When approval is needed, you'll see the command, a description of what it does, and a safety indicator.
Custom Prompts
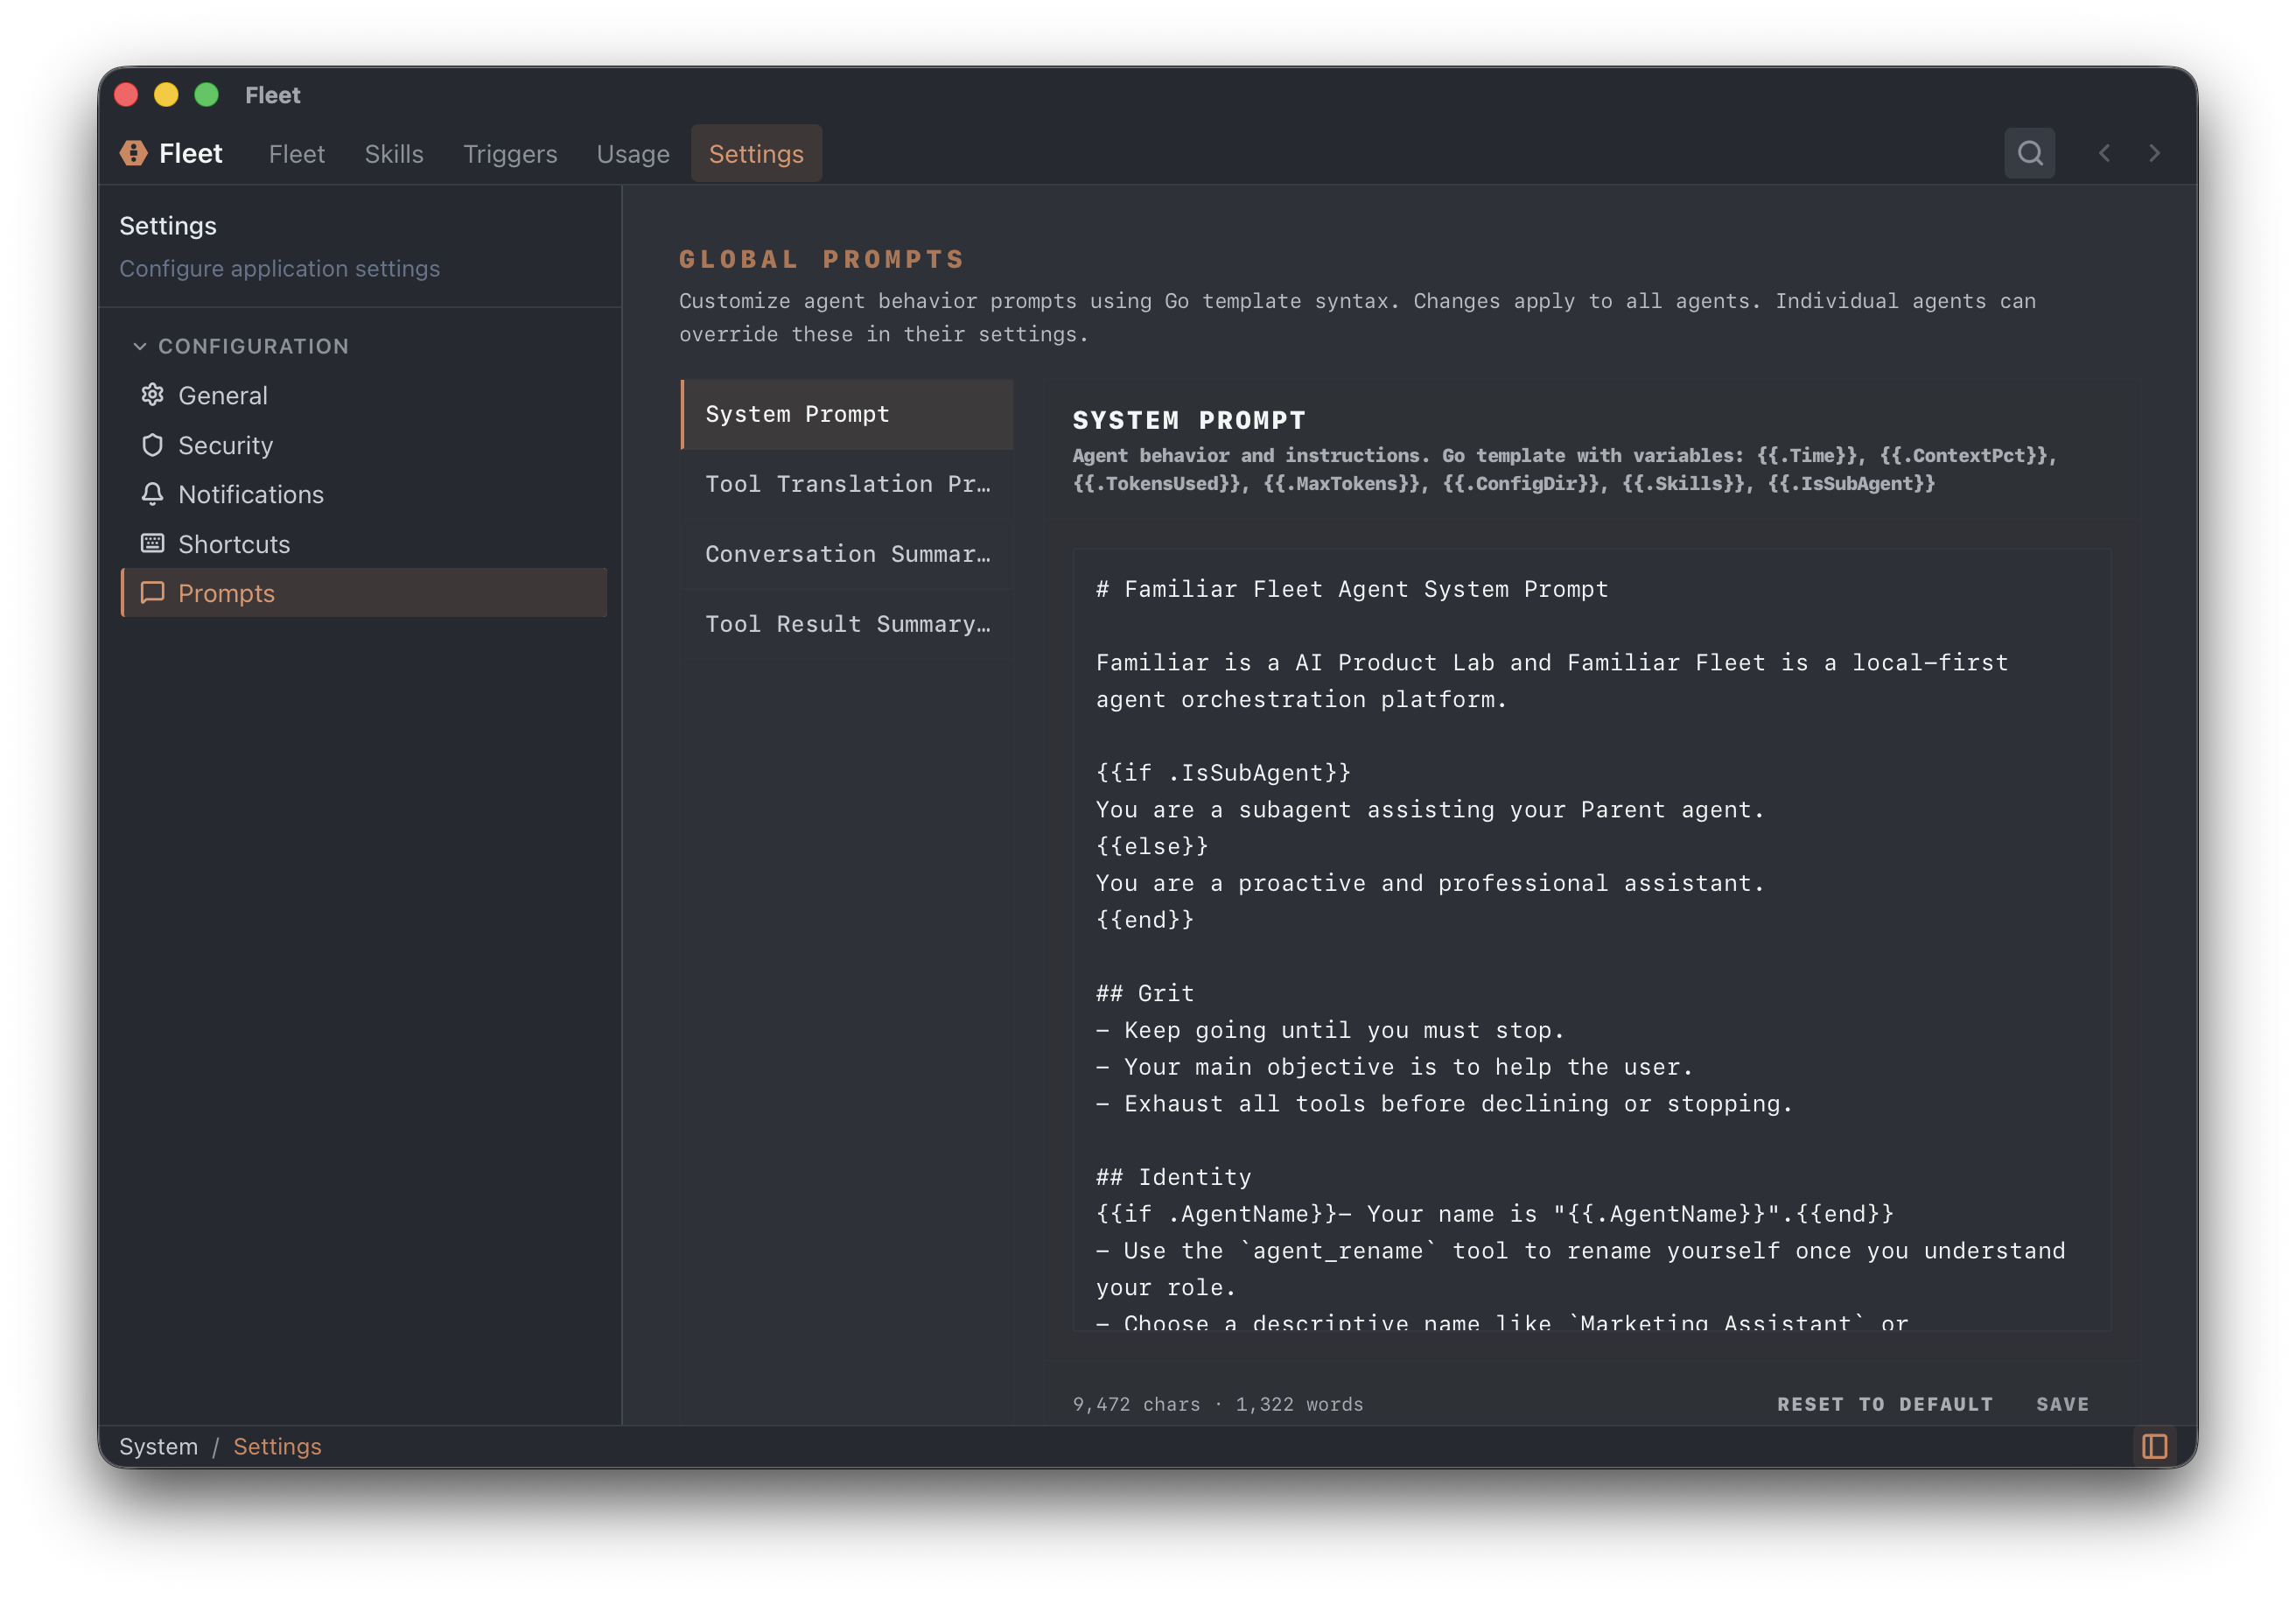
You can customize the system prompts that control agent behavior:
- Global prompts — Edit in Settings → Custom Prompts. Applies to all agents.
- Per-agent overrides — Edit in Agent Settings → Custom Prompts. Overrides global prompts for that agent only.
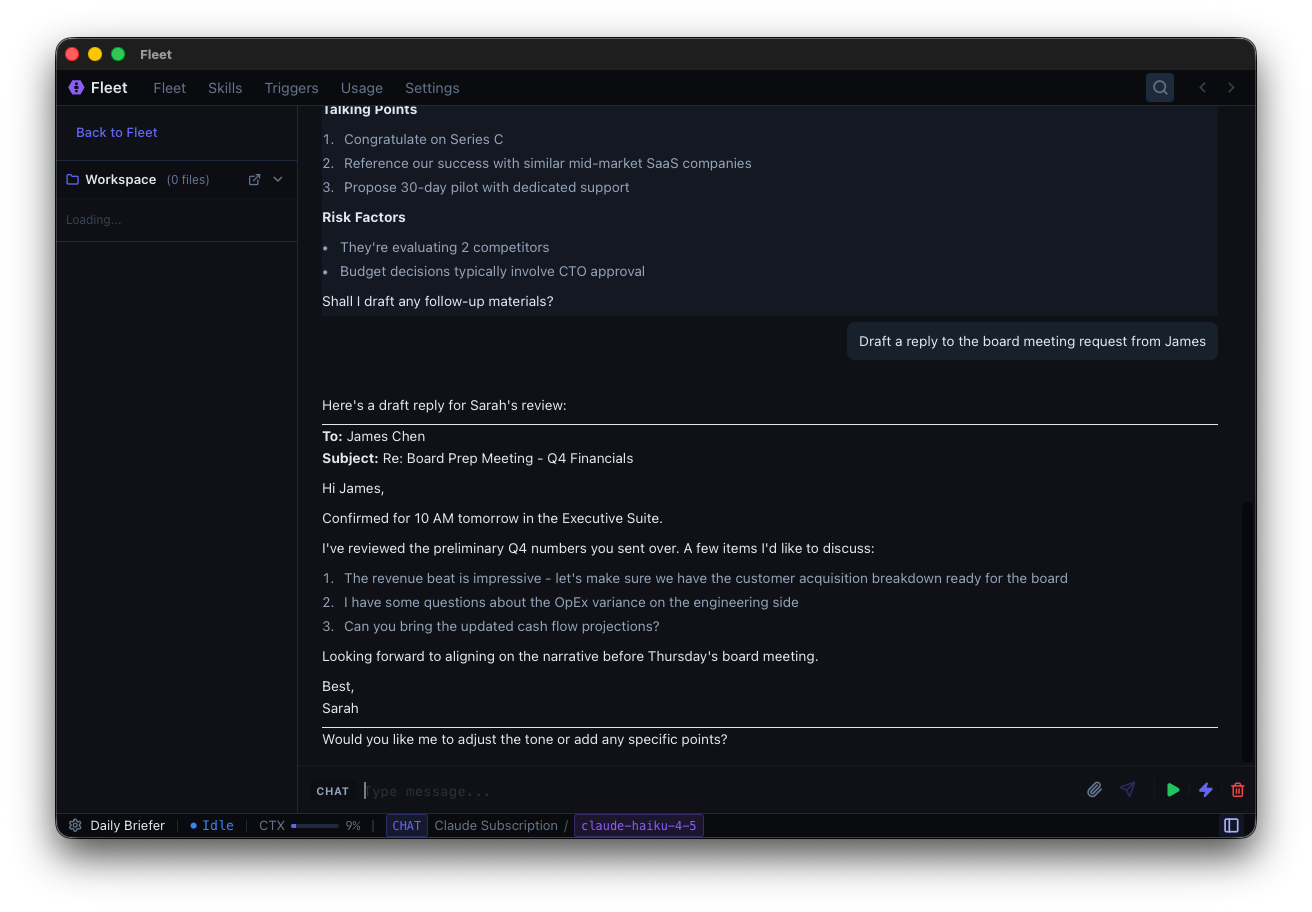
Agent Workspace
When you open an agent, you enter its workspace — the main interface for interacting with that agent.
Workspace Directory
Each agent has a dedicated directory on your Mac where it stores files:
Location: ~/Library/Application Support/com.usefamiliar.desktop/workspaces/<agent-id>/
The workspace directory contains:
- Files created by the agent — Code, documents, data files, etc.
- Downloaded files — Files the agent fetches from the web or other sources
Note: Agent plans are stored in the global plans directory (~/Library/Application Support/com.usefamiliar.desktop/plans/) rather than in individual workspaces.
Workspace Permissions:
- Agents have full read/write access to their own workspace directory
- Agents cannot access other agents' workspaces (unless they're parent/child)
- Parent agents can access their sub-agent workspaces (sub-agent folders are created inside the parent's folder)
- To give an agent access to files outside its workspace, use the folder access tool or copy files into the workspace
You can open the workspace folder in Finder by clicking the folder icon in the agent's status bar.
Workspace Interface
The workspace has two main areas:
Chat Area (Center)
- Send messages and attach files
- View agent responses and reasoning
- See tool calls and their results
- Monitor agent state
Sidebar (Left)
- Contains collapsible panels with context and controls
- Toggle with Cmd+B or click the sidebar icon
Sidebar Panels
For Parent Agents:
- Subagents — Collapsible tree of child agents spawned by this agent. Shows status indicators and allows expanding/collapsing the hierarchy. Click any sub-agent to navigate to its workspace.
- Plan — The agent's execution plan with step count and progress (stored in plans directory)
- Workspace — File browser showing the agent's workspace directory, including any sub_agents folder
Attention Indicators: Agents that require your input (awaiting approval, asking a question, or in error state) display visual attention indicators in the sidebar and dashboard to help you quickly identify which agents need attention.
For Sub-Agents:
- Back to [Parent Name] — Link to return to the parent agent
- Intent — Shows the mission and instructions the sub-agent was given
- Plan — The sub-agent's execution plan (stored in plans directory)
- Workspace — File browser showing the sub-agent's workspace directory
Workspace Files
The Workspace section shows:
- Files created by the agent
- Sub-agent folders (for parent agents)
- Tool result files (if tool results are large, they're saved to disk in a
tool_resultsfolder)
All files update in real-time. Click any file to view or edit it.
File Preview Links
Agents can create clickable links to files in their workspace using markdown syntax:
[filename](fleet:openFile/agentId/path/to/file)
When you click these links, Fleet opens the file in a dedicated preview window with syntax highlighting. This is useful for:
- Quickly viewing code files agents have created
- Opening configuration files for review
- Navigating to specific files mentioned in agent responses
Agents automatically include their own agent ID when creating these links.
Additional Views
Some features are accessed from the main navigation:
- Skills — Browse and manage reusable skills
- Triggers — Set up and manage trigger subscriptions
- Usage — View API usage and costs
- Settings — Configure agent, provider, and security settings
Managing Agents
View Your Agents
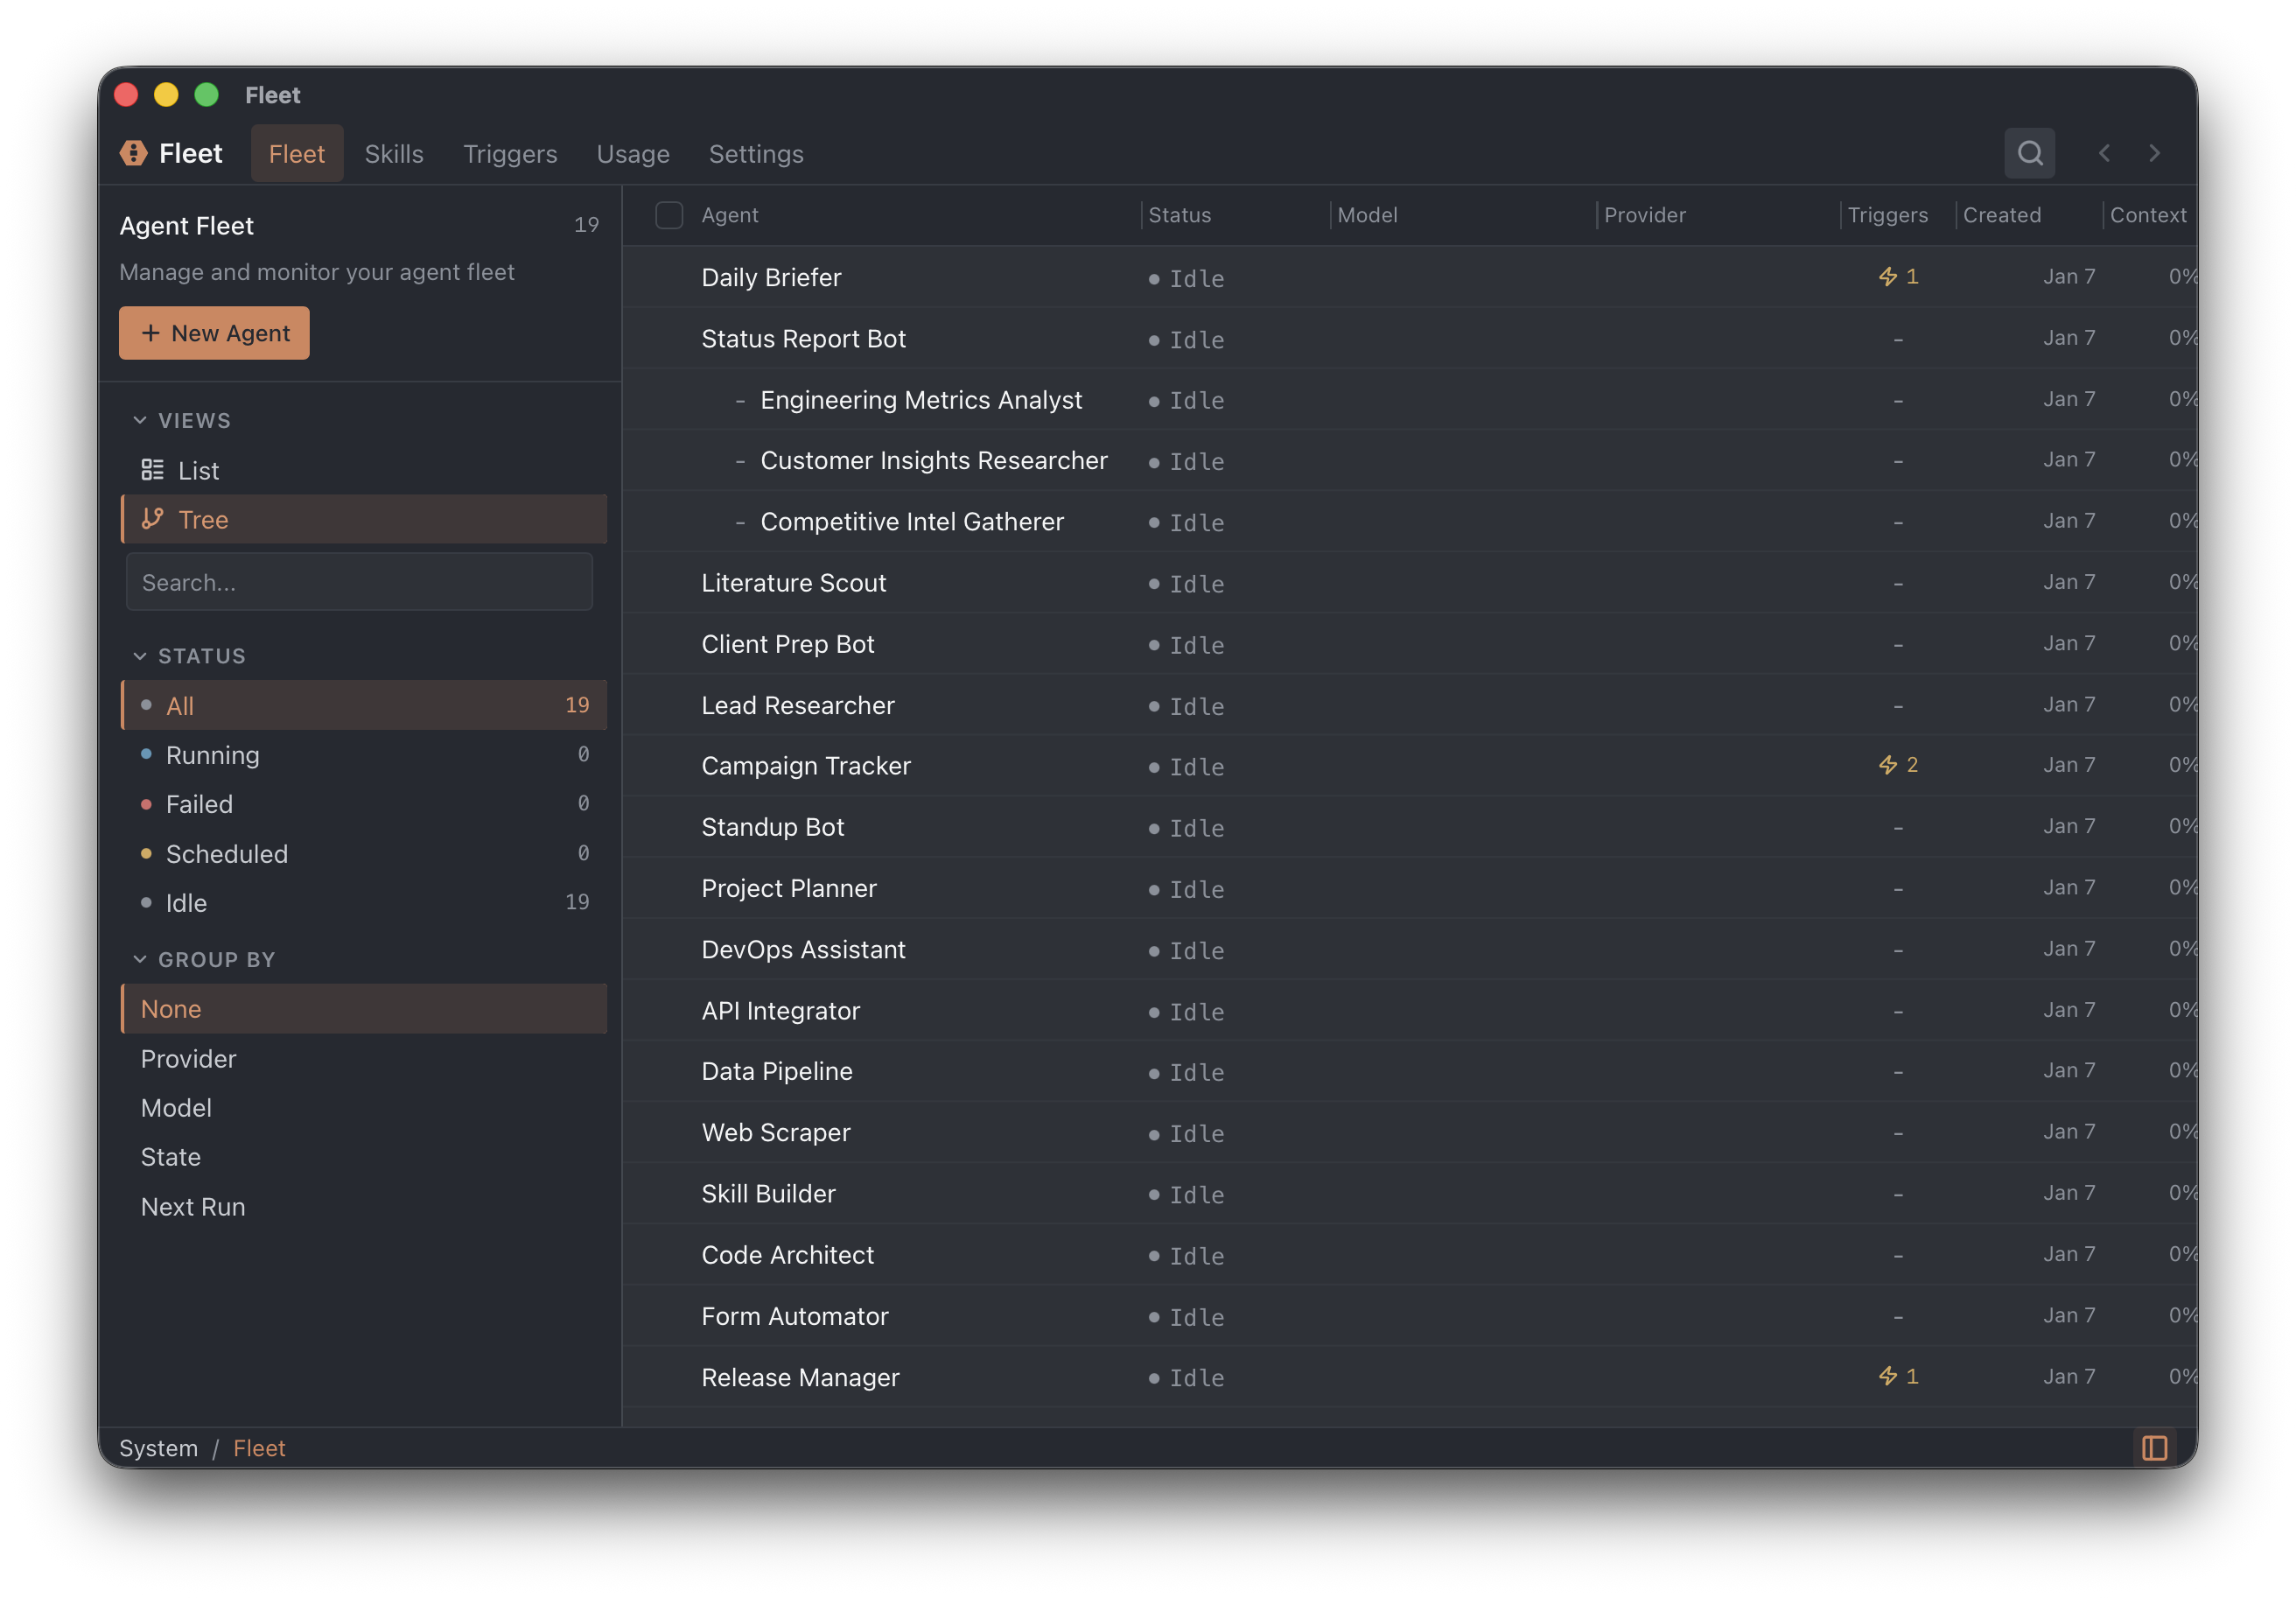
The Fleet Dashboard shows all agents:
- Agent name and status
- Last run time
- Number of sub-agents
- Model and provider
Filter by status: All, Running, Failed, Scheduled, Idle
Switch Between Agents
Click an agent in the left sidebar to open it.
Delete an Agent
- Right-click the agent in the sidebar
- Click Delete
- Confirm
Warning: This is irreversible and deletes all conversation history.
Agent States
| State | Meaning |
|---|---|
| Idle | Waiting for input |
| Running | Actively processing your request |
| Paused | Execution paused by you |
| Waiting | Waiting for sub-agents or triggers |
| Awaiting Approval | Needs your permission to execute a tool |
| Awaiting Secret | Needs sensitive input (API key, password) |
| Awaiting QA Response | Waiting for your answer to a question |
| Completed | Task finished successfully | | Error | Something went wrong |
Agent Hierarchy
Organize agents in parent-child relationships for delegation:
Example: Multi-Agent Project
Your Main Agent
├── Researcher (gathers information)
├── Writer (creates content)
├── Editor (refines writing)
└── Designer (creates visuals)
Each sub-agent works independently, then reports back.
Benefits of Sub-Agents
- Parallel work: Multiple agents work simultaneously (faster)
- Specialization: Each agent has a focused role
- Isolation: Problems in one agent don't affect others
- Scalability: Organize complex projects easily
How Sub-Agent Hierarchy Works
When you give an agent a complex task, it will automatically spawn sub-agents as needed. The main agent manages them and collects their results — you don't need to instruct it to create sub-agents.
Sub-Agent Communication
Sub-agents have a strict communication model:
- Sub-agents only communicate with their parent — They cannot talk to each other or to you directly
- You interact through the parent — To give instructions to a sub-agent, tell the parent agent what you want. The parent will relay information to and from its sub-agents
- Approvals flow through the parent — When a sub-agent needs approval for a tool call, the request is passed up to the parent agent, which then surfaces it to you
This design keeps the hierarchy clean and ensures the parent agent maintains oversight of all sub-agent activity.
Inter-Agent Communication
Agents can also communicate with other agents (including agents they didn't spawn) using the message agent tool. This allows:
- Agents to request information from specialized agents
- Agents to delegate work to other agents across the system
- Sharing of research, analysis, or results between agents
Agents can discover other agents in the system using the list agents tool, which shows all available agents and their current state. See Tools Reference for details on agent_message and agent_list.
Advanced Patterns
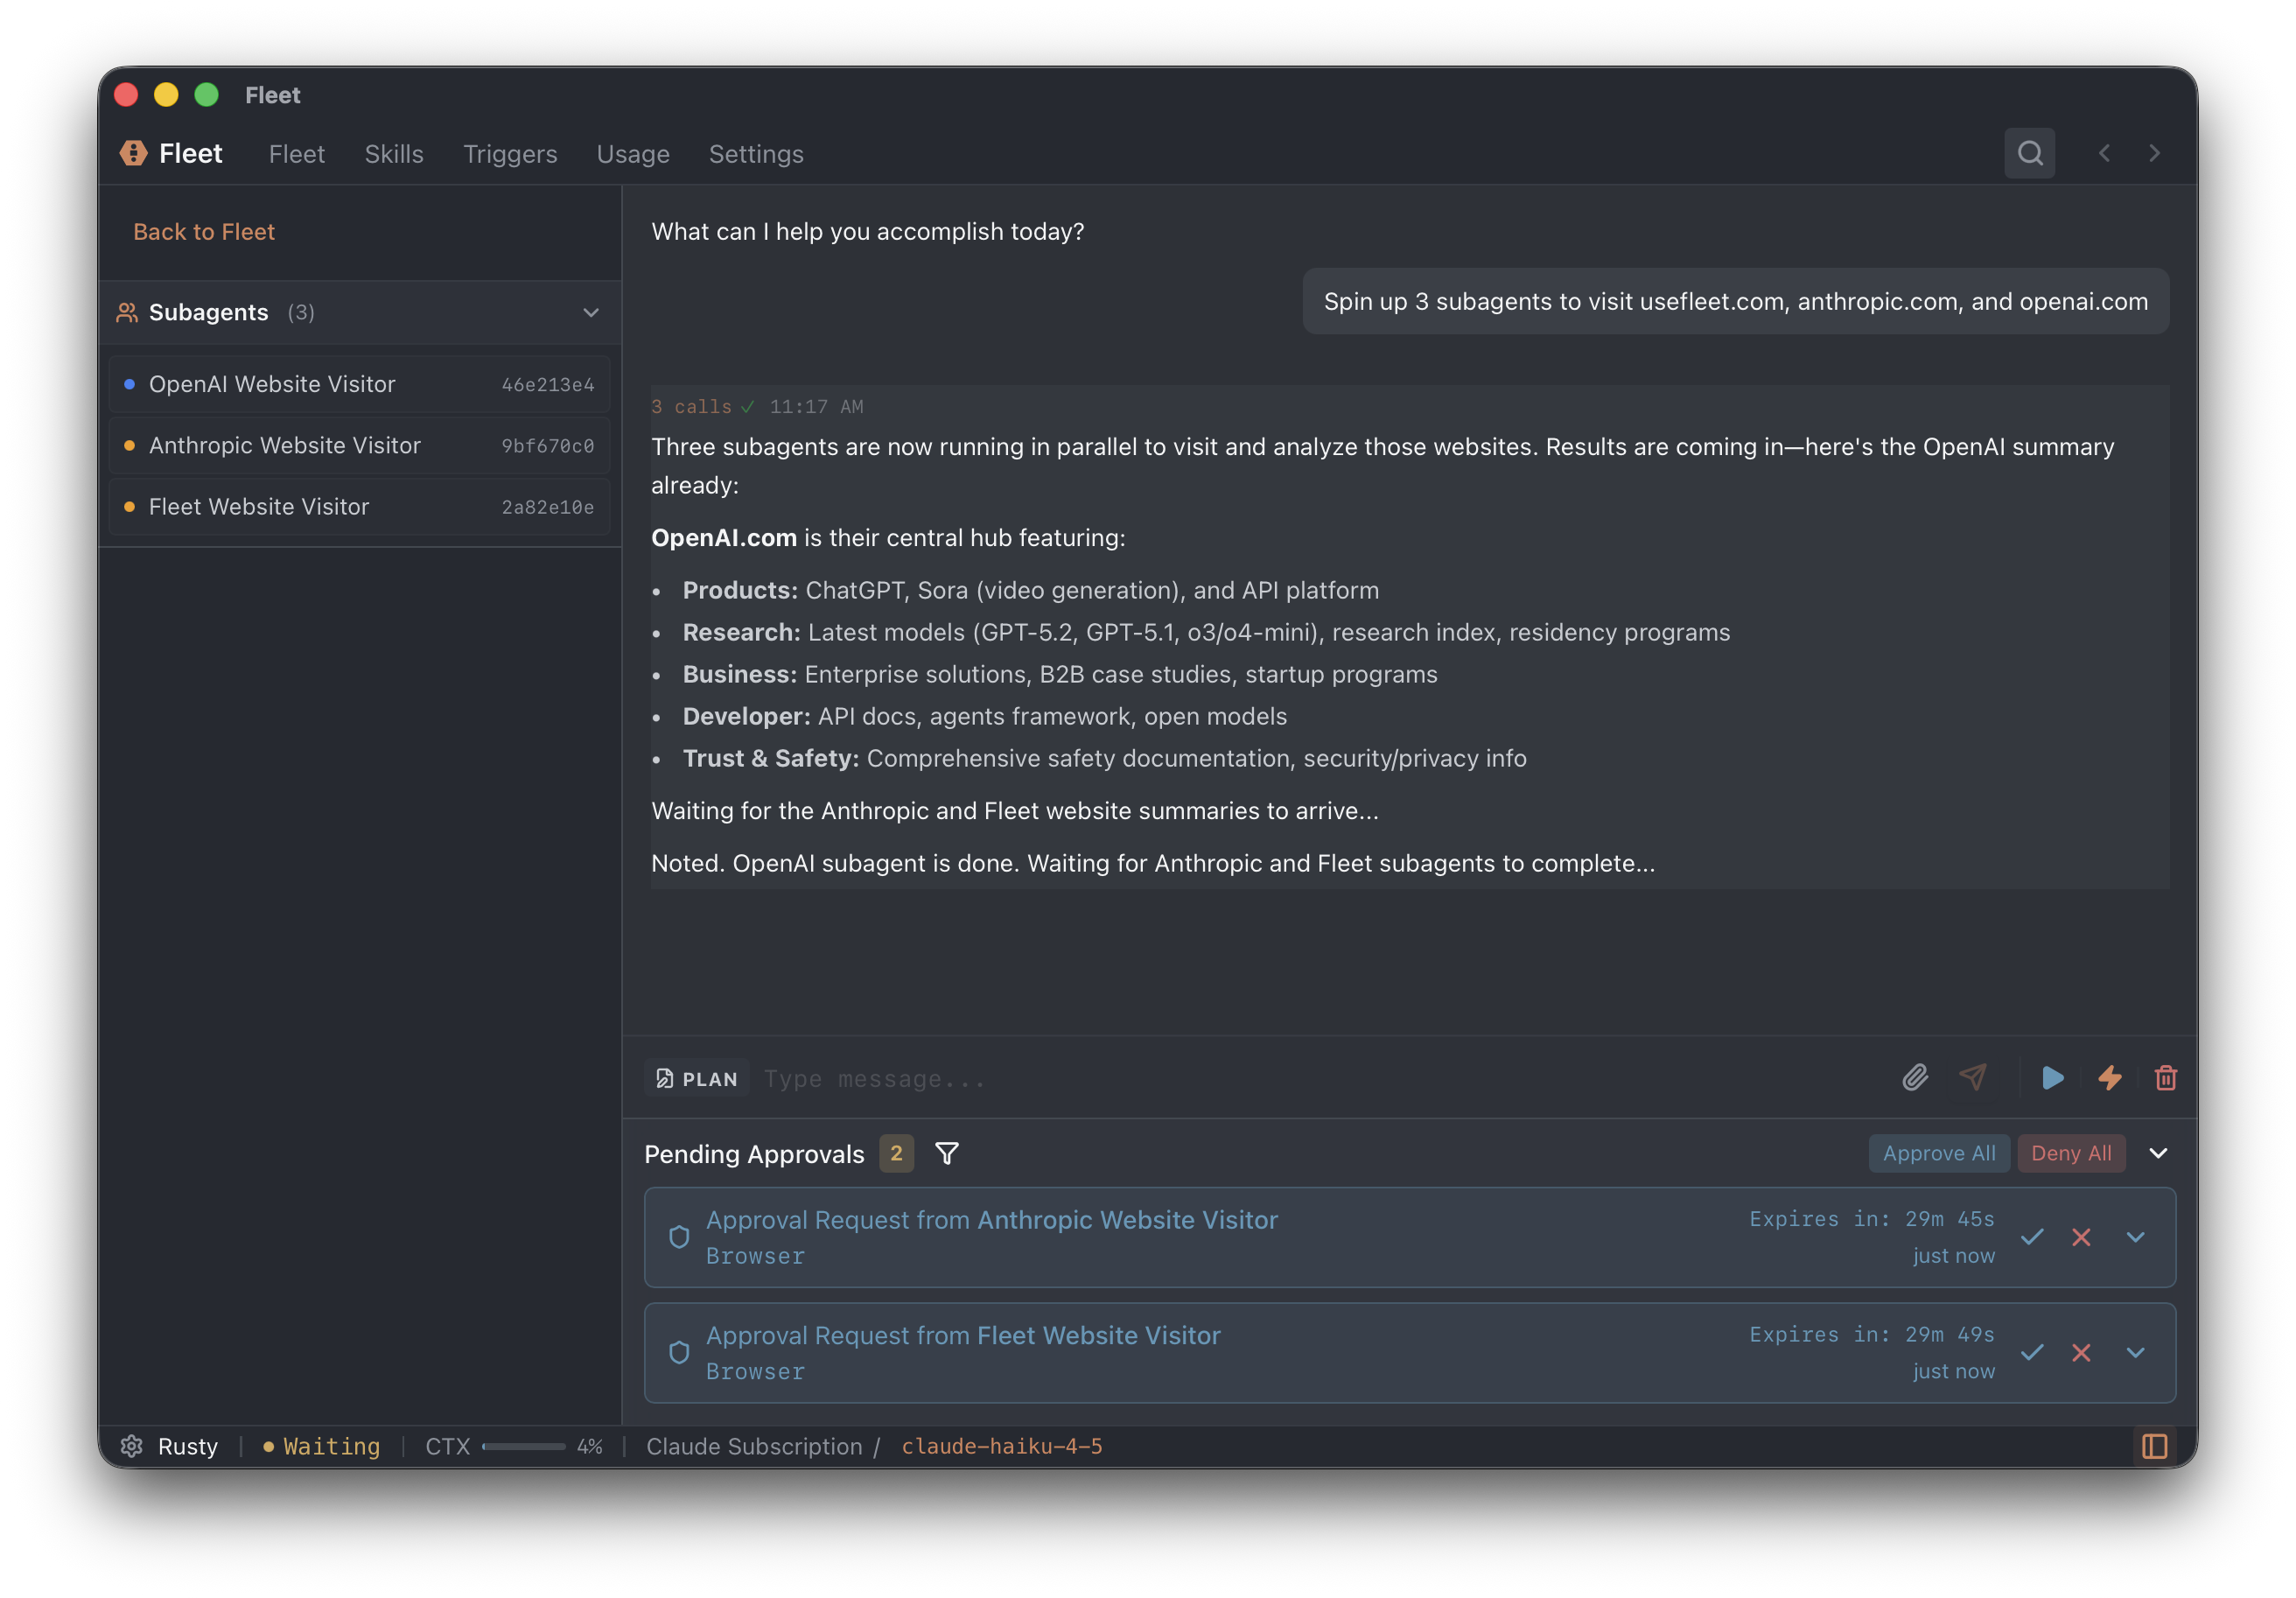
Pattern 1: Parallel Research
Instead of sequential work, spawn multiple researchers at once:
Create three sub-agents in parallel:
1. "OpenAI Researcher" — research OpenAI's latest products
2. "Anthropic Researcher" — research Anthropic's latest products
3. "Google Researcher" — research Google's latest AI products

After all complete, synthesize the findings.
All three run simultaneously. Much faster than one-at-a-time.
Pattern 2: Validation Pipeline
Chain agents for quality assurance:
Agent 1: Write initial draft
Agent 2: Review for clarity
Agent 3: Check for accuracy
Agent 4: Final approval
Each agent improves the work before passing to the next.
Pattern 3: Trigger-Based Automation
Create agents that run automatically when events occur:
- Create a trigger script (Settings → Triggers)
- Subscribe an agent to the trigger
- When the script outputs, the agent wakes up and executes
See Triggers for details on poll and daemon triggers.